Thursday, February 19, 2015

Annotating Text in Middle School English

In the past two weeks, annotating texts has come up a couple of times.  It all started when I got an email from one of my past students.  This particular student has been very thoughtful, as he not only visits his old stomping grounds, but he actually tries to improve what's going on here.  I find it refreshing that as he is sitting in his high school English class, he is thinking, "Wow, Mrs. Smith could give the kids a jump on this concept."  In a nutshell, the email said they were doing a lot of annotating, and maybe I should introduce it to the seventh and eighth graders.  This got my wheels turning.  Of course, "close reading" and "annotation" are words that are thrown around, but was I doing anything specific to prepare my students in these areas?

Then today, it came up again in a very real way.  My seventh graders are reading A Single Shard by Linda Sue Park.  They are around chapter 8, and they have gotten a lot of information about how Tree-ear and Crane-man live their lives.  After reading the first two chapters of the book, I prepped the students for a paragraph which was "coming down the line."  Today, I revisited that initial discussion and expected the kids to write the paragraph.  For you to really get a picture, here is a little bit more information.

The paragraph was to be a response to the following question: Explain what the quote means and how it relates to the situation of Tree-ear and Crane-man.  Use numerous text details to support your answer.  Pgs 44-45 might be a good reference.  

“Scholars read the great words of the world. But you and I must learn to read the world itself.”  Pg 7


And our initial discussion after chapters 1-2 contained this note: Scholars study books and learn from what they read.  Tree-ear and Crane-man must learn to read the world- meaning cultures.  They learn things by reading behaviors.  Not book smart, but smart with experiences.  

With a little help, the kids came up with those notes, so I was feeling very confident that they would have no problem writing this paragraph, even if it was coming two weeks later.  To my surprise, I heard, "I don't get it," and I saw confusion on faces all across the room.  It was one of those teacher moments when you think...what?  How do they not understand this.  What I realized (with a little self-reflection) is that the students were not making a connection between everything they had read in chapters 1-8 and this paragraph prompt.  It took them a long time to realize that Tree-ear "reads the world" in almost everything that he does (scavenging for food and getting a job being just two examples).  What would have made my students' lives much easier is if they were annotating the text.  If, after introducing the quote, I had said, "as you read, purposefully annotate the text with this prompt in mind," I would have gotten much better results.  

So, it is with great excitement that I embark on the annotation journey with my middle school students.  I read a very helpful blog post by Dave at Teaching the Core.  He both makes a distinction between annotation and the buzz word "close reading" and give step-by-step tips on introducing it in your classroom.  Here is his post (read it...you will not be sorry).  With Dave's assistance, I am going to introduce purposeful annotation with a folktale about foxes.    I have determined that the purpose in reading this article is to get a visual of a "clever fox" to connect to A Single Shard (so reading for understanding) and our end result will be a class discussion about the ways the author uses "cleverness" to make the story interesting.  In the story,"The Too-Clever Fox" by Leigh Bardugo, there are numerous examples of the fox being sly, but it becomes really interesting when there is a twist at the end which causes the fox to almost lose his life.  Hopefully this will also lead to a discussion about the fox being cocky.  Ultimately we will connect this back to Crane-man's experience with the fox.  I want the students to see the flaw in the idea that foxes are clever and magical.  In A Single Shard it says, "Foxes were dreaded animals.  They were not large or fierce, like the bears and tigers that roamed the mountains, but they were known to be fiendishly clever.  Some people even believed that foxes possessed evil magic" (Park 82).  I think this activity allows the students to see the fox in a different light and then they will be able to imagine what would have happened if Crane-man had continued on his journey instead of turning back when he saw the dreaded fox.  

Annotation is not really different from engaging with the text through, say, a dialectical journal, which is something I do with my 8th graders quite often, but there is something about having the writing directly on the text that is really appealing to me.  As students enter higher level English classes, it may be the case that they own their books and can write in them freely.  However, for middle school English, this is one area that will be a struggle.  The 8th graders are about to start To Kill a Mockingbird, which for some students is a difficult book.  I am going to need to think of a way to have them meaningfully annotate their borrowed books.  Perhaps it will be with sticky notes, although I personally feel that is just not the same.  

If you have any ways you use annotation, especially with books that the students cannot write in, let me know.  I am all ears!

As always, thanks for sticking with me in this journey. 

Monday, December 15, 2014

It's Christmas Time

I have been thinking a lot about my lesson plans for this week...the week before Christmas.  We have wonderful holiday traditions at St. John's which include the Christmas Concert on Thursday and a caroling assembly and faculty/8th grade luncheon on Friday.  Lots of fun to be had by all for sure, but how can I keep my lessons engaging up until that last day?  Here are some of my thoughts.

Today, I did a lesson on allusion in The Giver.  I realized that teaching allusion with pop music might be just the thing to spruce up the lesson.  I hopped onto YouTube and showed about the first minute of the following two videos:


Allusion to Shakespeare's Romeo and Juliet

Allusion to Kryptonite (Superman)

This was the hook for the lesson.  I didn't tell them what we were doing just yet.  I had them watch the first video and try and find some connection to a literary device.  They had no idea, at first.  We watched the first minute again, and with a little prodding, they got it.  They didn't know the name of the literary device, but they knew what I wanted them to "get."  Taylor Swift was referencing Shakespeare's Romeo and Juliet.  In the second video, Kryptonite comes and goes very quickly, so they needed to actually see the lyric to "get it."  This is the video I used for the lyrics:


At least with that class and that concept, I started the week off strong.  One day down, four more to go.

Here are some things I am planning for the rest of my week--
Comma Jeopardy- because who wouldn't want to review commas (and take a quiz) the week before Christmas.

Writing about gratitude-- This will actually be in connection to the literature that we are reading.  The students will write about something that they are grateful for, and then they will think about the main character (or person) in the book(s) they are reading.  The 8th graders are reading Anne Frank's Diary and the 7th graders are reading The Giver.  So, is Jonas showing gratitude and in what way?  Is Anne showing gratitude and in what way?  For the part where the students write about their own gratitude, I was inspired by a post on Two Writing Teachers.   I am going to make it into a worksheet for the students with one side being to write about themselves and one side for them to write/reflect upon the character/person in the book they are reading.

One other possibility for this week came from a post on I'm Lovin' Lit from 2013.  She shows a Christmas movie, but not just for entertainment.  She shows it to teach/emphasize literary concepts for the students.  Things like theme, characterization, conflict!  I love this idea.  I haven't yet decided in what way I am going to use it because I think I will only need it for one class period on Friday.   I will probably modify it a bit to fit my needs, but it is totally worth getting the freebie and checking out her post here.  Thanks, Erin!


And with that, I hope it will be a Merry Christmas to all as we enjoy this final week before Christmas.

Saturday, October 25, 2014

Symbaloo

After having my students bookmark another page for English last week, and hearing, "but I already have so many bookmarks," I decided to start a Symbaloo page for my classes.  Have you heard of Symbaloo?

I am still a Symbaloo newbie, but here's my take--


Symbaloo allows you to have a webpage that organizes all of your bookmarks.  You can share your page with others and they will be able to see all of your bookmarks, but they can't add to your bookmarks.

Here is what my Symbaloo currently looks like:
http://edu.symbaloo.com/mix/smithstjes


While it is true that my Symbaloo does look a little bare right now, it actually took me a bit of time because I was customizing it.  I added pictures to some of my links to make them more interesting.  Some of the links already came with their own icons that I liked (Actively Learn and ExitTix above), but others weren't great.  You have two options for adding pictures.  One is to upload your own image which I did for the St. John's link, the third link from the left on the top row.   Or you can use one of the Symbaloo icons, such as the first two icons on the top left.

Here are some of the top reasons I like it--


1. I can post both links that I want the kids to have long term access to and daily lesson plan links that I will remove more quickly.

2. It is easily organizable and visually appealing.

3. I can embed it on to my class website (as I did above).

4. It is a great way to find something (especially things you use often) without adding tons of things to your bookmark bar.

It reminds me a little bit of how I have started to use Pintrest.  The main difference for me is that I like to "pin" things that I am not ready to use yet.  It is nice to keep those resources in one place.   Then if I am looking for something to jazz up a lesson, I can check Pintrest for some inspiration.  Once I have found a link that I want to use over and over, then I will add it to Symbaloo.

Just a quick note about embedding.  I initially had some difficulty embedding my Symbaloo page above.  Here is the tip that eventually got it to work--switch to "HTML" at the top of the screen on blogger.  That way when you embed the HTML code, the website can read it.  So thankful to have figured this out to use it on other sites as well.

Have you used Symbaloo?  How do you like it? 


Friday, October 3, 2014

Google Apps for Education (GAFE) Reading Apps

I learned about various apps/extensions during the Google Apps for Education (GAFE) session at Ed Camp Baltimore on September 27, 2014.  Today's post will be about two of the reading apps that I learned about.  These are for the Chrome web browser.  If you don't use Chrome yet, I would suggest a switch in your default Internet browser...because it is amazing!

 Readability 

This is an extension that you can find by going to the Google Chrome Web Store.  The icon is a red arm chair.  

This extension is very useful if you have your students reading articles from websites.  The purpose of the extension is to clean up the appearance of the website.  Often times, news sites have excessive links all around the article.  The look is very busy and it can be difficult to focus on the text you actually want to read.  Once you have found the article you want to read, you just click the readability button and it gets cleaned up for you. 

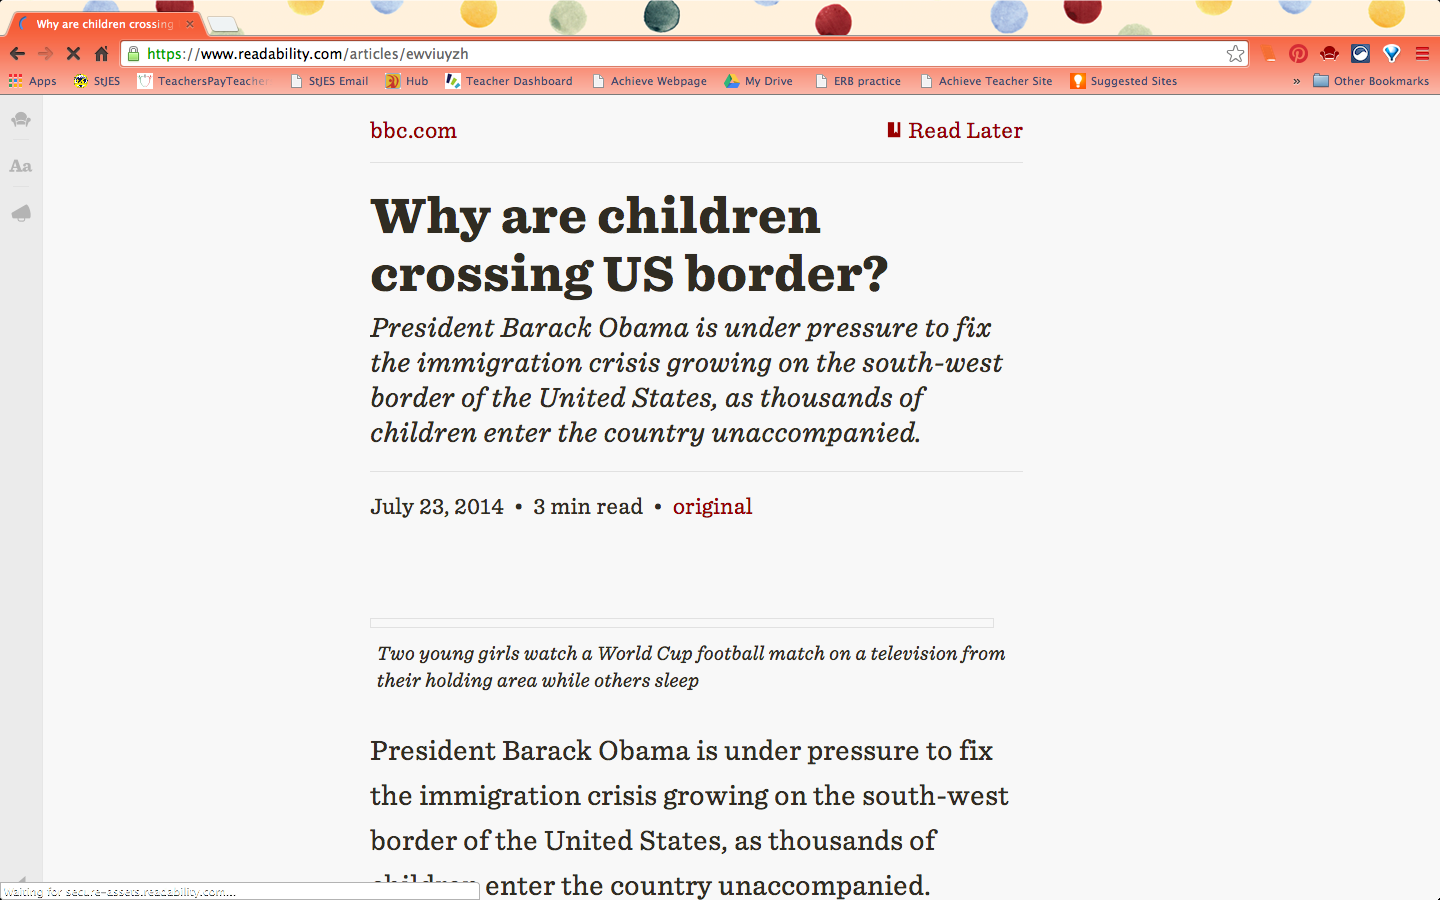
Let me show you an example.  Here is the original article that I wanted to read from BBC News.  


 I c
licked the Readability icon at the top of my web browser.


And in seconds my article looked like this:


Your article will still have the pictures that are specific to it, just not all the extra stuff from the website.  It is much easier to read, but there are other features too.

Once your article is cleaned up, (I selected "read now"), you should have a row of buttons on the left hand side of the page.
The first button is the Readability logo.  This is for logging in to the Readability site, which doesn't seem necessary to me.
The second button looks like this- Aa - and it gives you access to some features that will personalize your reading experience.  You an change the color, font, size of text, and size of margins.
The third button (a megaphone) also asks you to log in to the app.
The fourth button is a little arrow and it allows you to send this text to your kindle, email, Twitter, or Facebook or you can print it from here.

While I have not yet used this link with the students, I think it will be very useful.  

TLDR

TLDR stands for Too Long Didn't Read and it is another Chrome extension.  This one does not seem to work with an article that has already gone through Readability, so it will have to be done on the original website.  The purpose is to create simplified texts for English Language Learners or other students who could benefit from a summary or a shortened version.  I think it would be especially helpful when trying to do research for a project.  By reading a summary, you can decide if that article will fit your needs.  If you determine that it might be a good one, then you can go on to read the original text.  I can't speak to how well it shortens the text, but it does provide a short, medium, and long version of the article.  

The icon for TLDR is those four letters in blue and green lowercase letters.  Once you are on the article that you want to use it with, click the button and a dialogue box comes up in the middle of your screen.  It then lets you click what you want to read- summary, short, medium, long, or original.  At the bottom, there is a "find more like this" button, but it seems to me that that button is referring to more apps/extensions, not more articles.  My primary purpose would be to use the summary feature to get an idea of the article, and then to read the original to see if you can use it.  I do not believe it works on PDFs, just on websites.

The question will be, can students handle the power of an extension like this?  Perhaps you want your students to read an entire article, but they have been armed with this extension.  They might be able to "get away with" only reading some of the text.  For now, I am not going to introduce this extension, but rather, I will use it myself to provide summaries.  One example is for a mini-research project where I will be providing the links.  I can now include a short summary with each corresponding link, so the students can pick the best articles to fit their needs.

I am excited for what Google Apps and Extensions can do in our classrooms.  These are just two examples of many useful resources.  This is just scratching the surface. 

What are your favorite GAFE that are related to reading?


Sunday, September 28, 2014

Ed Camp Baltimore-- September 27, 2014

Yesterday, I went to Ed Camp Baltimore.  This was my first officially Ed Camp experience, and I LOVED it!  Have you heard of this type of professional development?  It is an "unconference."  You can read about it directly on the Ed Camp Baltimore website, but I'll also give you my version of the day's events.

Here's my take on the event-

Registration
The technology coordinator at my school informed the staff about the Ed Camp Baltimore conference.  I knew that she had gone since its inception, and at her recommendation, I wanted to check it out.  I was planning on registering a couple weeks prior to the event, but at that point, I wasn't ready to commit to attending.  A few days ago, I decided I wanted to attend.  The event was FREE, so unfortunately they were out of tickets.  Luckily, I joined the waitlist and a spot opened up!  

The Schedule is Created
When you arrive at an Ed Camp conference, all the participants are gathered in a common area and that is when the schedule is set for the day.  I know that sounds weird, right.  The schedule is not set prior to the day of the event, nor are the presenters.  Anyone who has an idea can put a sign up with their idea, and it might become a session for the day.  I put up a topic for discussing writing instruction and assessment with a connection to Google Docs.  Initially, my session was combined with another session on discussing everything Google Apps for Education (GAFE), but some more shifting occurred, and I got to have my session too.   Once the schedule was set, it was all compiled on a Google Doc.  Here was our final schedule for the day.  Check out the photo gallery from Ed Camp 2012 for a better idea of how this scheduling works.  

The Sessions Begin 
Everyone chooses a session that sounds good to them.  You head to the room of your chosen session and the person that suggested the topic presents.  Often times, the floor is opened so other teachers that have expertise on the subject can share their ideas.  The GAFE session was the first session I attended.  Then I led a discussion about writing during session 2.  There was so much of value at the sessions that I attended that I am going to dedicate full blog posts to new apps and websites that will revolutionize your teaching.

Smackdown
After the first two sessions, everyone joined in the auditorium for a smackdown of resources that they find helpful.  This was so informative!  Anyone could go up to the front and share something with the group.  A recorder was also taking notes for the group.  I would definitely recommend you look at the list of resources from the smackdown.

Back for More
After lunch on your own, it is back for two more afternoon sessions.  This followed the same format as the sessions above.  One thing that is stressed at an "unconference" is that you are free to switch sessions at any time.  The motto goes something like this- If you aren't learning or contributing, use your two feet to take you somewhere else.  This means that you can get the most out of your day.  Another great aspect of this conference is that all the notes were online.  There was a shared Google Doc for each session (again use the links on the schedule page).  That way, if there were multiple sessions you wanted to attend, you could easily benefit from them by looking at the notes later.

Closing
After all the sessions, we congregated in the auditorium for a raffle.  The event had no advertisers, but there were sponsors who offered numerous prizes.

Key Takeaways
I think one of my main takeaways is that there is a rich community of educators that stay connected through technology.  For example, there many who stay connected on Twitter, and I want to be part of that community of educators, both to learn from them and to add to the conversation.

I also want to blog more regularly.  It is something that I have been doing more for myself, but I want my voice to be part of this online community of educators.  Yesterday I read a really great post by Jenna Shaw, a member of this year's Ed Camp Baltimore Organizing Committee.  She talked about this exact concept in her post "Connected Responsibility."   She says, "If I am to truly be connected to others, it must be a consistent effort that rises above some of the individual difficulties I experience with inspiration, time, and effort, in order to ensure that the community I am helping to connect is able to share their voice."  I wholeheartedly agree with this.  Blogging, like so many other aspects of education, is time consuming.  It is something that I want to schedule into my week just like I schedule in planning and grading.

Looking Ahead
Are you looking for an Ed Camp experience?
MSDE is hosting an Ed Camp in Baltimore on February 7.   Not from Baltimore? Look up Ed Camps in your area.  They are happening all over the world!

Tuesday, June 17, 2014

Collaborize Classroom


        Technology is a very important part of educating well rounded, 21st century learners. More and more, technology skills are becoming part of employment requirements. According to the Iowa Department of Education, “technological literacy supports preparation of students as global citizens capable of self-directed learning in preparation for an ever-changing world.” Using technology in the classroom has to extend beyond word processing skills to really be useful to the students. Technological literacy should also incorporate cooperative learning. Students will need to know how to interact with their peers in an online environment, be it through commenting on blogs or participating in a discussion board.

         There is one website that I was recently exposed to that meets all of the requirements above: Collaborize Classroom. This free web tool allows teachers to create a website and then have online polling or class discussions. With chromebooks in the classroom, I can see the students engaging in class using this tool more readily and easily than hand raising allows. It also seems to be well designed for educators. When you register, Collaborize Classroom provides you with three discussions to get started. The first one is “Establishing Expectations for Behavior: Dos and Don’ts for Online Student Communication.” This is a great way to start an online discussion board. It rivals the class expectations discussion that many teachers have using chart paper at the beginning of the year. This topic shows me that Collaborize Classroom is designed with teachers in mind. They are just moving successful teaching practices to an online platform. The second step (as they call it on the website) is “Maintaining a Safe Space Online: Which Behaviors are Most Important.” These two online discussions are not only helping the students learn appropriate online behaviors, but they are also teaching the students how to use this website. As opposed to opening a new Google Doc and taking notes, we get to participate in polls and see the results. Using this tool for polling and class discussions would allow us to meet the same curricular goals in a 21st century way.

         As I was playing around with this tool, I saw one potential drawback. I was hoping that I could create a different website for each class I teach, but it seems like that is not possible. Instead, they have an option to create groups. It is difficult to know if that will meet my needs until I try it. I do want some separation between my classes, though. When I receive my class lists in August, I will be able to actually create my “groups” and see how it works.


Here is a screenshot of my newly created Collaborize website:


I also recommend that you check it out yourself. This is not a sponsored post, just a website that I found recently that I think will be a useful classroom tool. I hope you find it to be useful as well.


http://www.collaborizeclassroom.com/

Tuesday, March 11, 2014

Tried it Tuesday- Pennant Banner


I am so excited to link up with Fourth Grade Flipper for this week's "Tried it Tuesday."


The project:  Make a banner for a baby shower.  It turned out great, and now I am happy to offer it as a freebie.  

My Banner: 

You will notice that I have the mother's name above the "baby shower" banner.  If you want to add the name or spell out something for your classroom, then you should buy the A-Z Banner.  At this point, I have not done any punctuation marks.  If you would like punctuation, just shoot me an email.  I will be happy to accommodate special requests.  My banner was a grey chevron with navy accents.  In the example below, I have used pink chevron and black accents. 

Here's what I did:
1.  I opened powerpoint and changed the orientation to 8.5 x 11.  In my version of powerpoint it is under the "themes" tab at the top.  Then you choose "Page Setup."  Here is what it looks like:
2.  Insert a triangle.  I deleted the text boxes first because I like looking at a clean sheet; however, I don't think they would actually impede this process.  The triangle defaults to blue.  I wanted to fill mine with some awesome digital paper I got from Miss Nelson.  

3.  In order to fill it with the digital paper, you need to right click on the shape and choose "format shape."  This will pull up the following menu:
You need to choose the picture of the digital paper from your hard drive (or wherever you have it stored) and then it will fill the shape.  Can you believe it is that easy?

4.  Then you can use the very small green circle at the top to rotate your shape 180 degrees.  This is what it will look like:

You can see the faint blue line around the outside still.  That is what we will take care of next.  

5.  You want to double click on the shape, choose line, and then change the color and weight of the line to make it more to your liking.  I am going with black for this example:


6.  Finally, I added a circle (made the fill white and changed the line to dotted) and put a fancy letter in the middle.  To insert the letter you will need to right click and "edit text." I chose a fun font from Kevin and Amanda and made it 150 pt.  Here is what it would look like after that step:


Note: my font defaulted to white on a white background, so I needed to highlight it and change it to black. 

So that is how I "tried it" this "Tuesday" (actually more like last Tuesday).  I hung my banner with tulle from Michaels.  The picture above isn't great due to the lighting, but I got so many compliments on it.   I am so excited about my new A-Z Banner.  I hope you like it, and if you want to buy it, it is currently on sale!